Compute Freedom: Scale Your K8s GPU Cluster to 'Infinity' with Tailscale

In today’s world, where the wave of artificial intelligence is sweeping the globe, GPU computing power is a key factor of production. However, a common pain point is that GPU resources are both scarce and expensive.
Take mainstream cloud providers as an example. Not only are GPU instances often hard to come by, but their prices are also prohibitive. Let’s look at a direct comparison:
- Google Cloud (GCP): The price of one H100 GPU is as high as $11/hour.
- RunPod: The price for equivalent computing power is only $3/hour.
- Hyperstack / Voltage Park: The price is even as low as $1.9/hour.
The price difference is several times over! This leads to a core question:
Can we design a solution that allows us to enjoy the low-cost GPUs from third-party providers while also reusing the mature and elastic infrastructure of cloud providers (such as managed K8s, object storage, load balancers, etc.)?
The answer is yes. This article will detail a hybrid cloud solution based on Tailscale and Kubernetes to cost-effectively build and scale your AI infrastructure.
1 Solution Overview: Building a Unified K8s Cluster Across Networks
The core idea is: to use Kubernetes as the unified AI infrastructure foundation and leverage VPN technology to seamlessly ‘merge’ cheap GPU nodes scattered in various locations into the main K8s cluster on the cloud.
This way, external GPU nodes act just like regular worker nodes in the cloud, and can be scheduled and managed by a unified control plane. The architecture diagram is as follows:
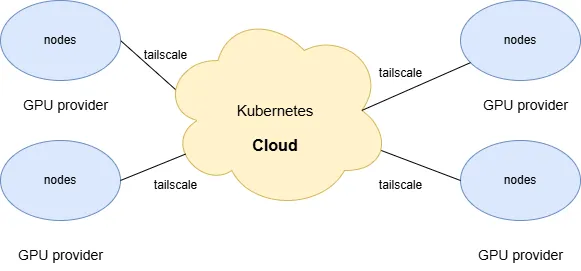
In this architecture, regardless of whether the nodes are in GCP, AWS, or a RunPod data center, they are all within a large logical internal network, with network connectivity, providing a transparent computing power pool for the upper-level applications.
1.1 Solution Selection and Considerations
Before getting started, you might wonder:
1.1.1 1. Why not use a multi-cluster solution?
Setting up a separate Kubernetes cluster for each GPU provider and then interconnecting them with multi-cluster management tools (like Karmada, Clusterlink) is a common approach. However, for this scenario, it has the following drawbacks:
- Resource Waste: Each independent K8s cluster requires an additional Control Plane and various management components, which consumes valuable CPU and memory resources.
- Management Overhead: The number of nodes from GPU providers is usually small (perhaps only a few to a dozen), so maintaining a full cluster for them has a low return on investment.
1.1.2 2. Why not choose K3s?
K3s is an excellent lightweight Kubernetes distribution, very suitable for edge computing scenarios. However, we did not adopt it here for the following reasons:
- Resources are not the bottleneck: In this scenario, the hardware performance of both cloud nodes and GPU nodes is quite strong, so we are not pursuing the extreme low-resource overhead of K3s.
- Network Complexity: K3s comes with its own networking solution to simplify deployment. However, in a cross-cloud, cross-data-center scenario, using a lower-level network-level solution (like Tailscale) is more direct and controllable than adding another layer of network configuration on top of K3s.
1.2 How to Solve the Cross-Network Interconnection Problem?
The most direct way is to establish a VPN connection between the two networks, making all nodes feel as if they are in the same local area network.
Tailscale is a great tool that can achieve this goal simply and cost-effectively. It’s a VPN service built on the open-source WireGuard® protocol, which can easily connect devices in different networks into a mesh network, making device-to-device communication as convenient as if it were on an internal network.
Its biggest advantage is that it greatly lowers the barrier to using WireGuard, requiring no complex configuration, and also provides advanced features like NAT traversal and network ACLs. Even better, its free personal plan supports up to 100 devices, which is more than enough for most small to medium-sized businesses and individual developers.
2 Architecture Plan
Here we will use Tailscale’s subnet router feature, which allows Tailscale to act as a router, routing traffic to advertised subnets within the Tailscale network.
2.1 Direct Connection
To reduce network latency between Tailscale devices, we want them to connect directly rather than through a relay server.
The conditions required for a direct connection in Kubernetes are:
- The node running Tailscale needs a public IP address.
- Tailscale must run in host network mode.
- Inbound access must be open for UDP port 41641 (the communication port for Tailscale).
- Outbound access must be open for TCP ports 80 and 443.
2.2 Without Using Tailscale Operator
Tailscale has developed the Tailscale operator for Kubernetes scenarios to simplify deployment and management, but its design is for limited use cases, such as accessing services within the cluster from outside, accessing external services from within the cluster, or connecting a local machine to the Kubernetes network. None of these fit our requirements.
Furthermore, the subnet router feature of the Tailscale operator does not meet our needs either:
- The subnet connector instance it generates is a StatefulSet pod with only one replica, and it cannot be modified.
- Its network mode is pod networking, and it cannot be changed.
This does not meet our high-availability requirements of deploying multiple instances and needing host networking.
2.3 Other Requirements
- The subnet IPs of all regional nodes (Node CIDR) and Pods (Pod CIDR) must not overlap.
- Different subnet regions can use different CNIs, as long as the pod networks in different regions can communicate with each other.
- The operating system of all nodes running the Tailscale client must be Linux.
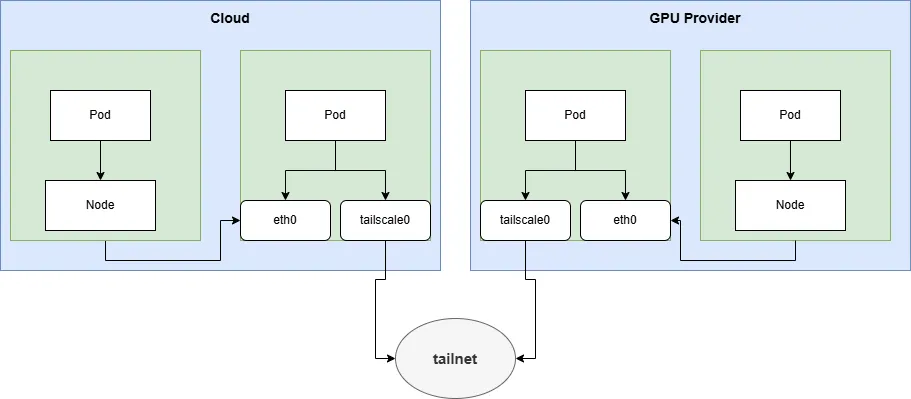
2.4 Option 1: Per-Node Subnet Router
- Each node is allocated a Pod CIDR.
- Each node runs a Tailscale client and advertises its own Pod subnet.
- For communication between node subnets in different regions, each region needs to run a Tailscale client to advertise its node subnet. This Tailscale client can be deployed separately or reuse an existing one.
Pros:
- Good Fault Isolation: The blast radius is small. If a node’s Tailscale instance goes down, it only affects pod communication on that node and does not impact pod networking on other nodes.
Cons:
- High Network Overhead: Communication between pods on different nodes needs to go through Tailscale, which increases network overhead.
- Device Limit: The number of Tailscale devices increases with the number of nodes, making it easy to exceed the 100-device limit of the free plan.
This solution is similar to the Tailscale integration with K3s.
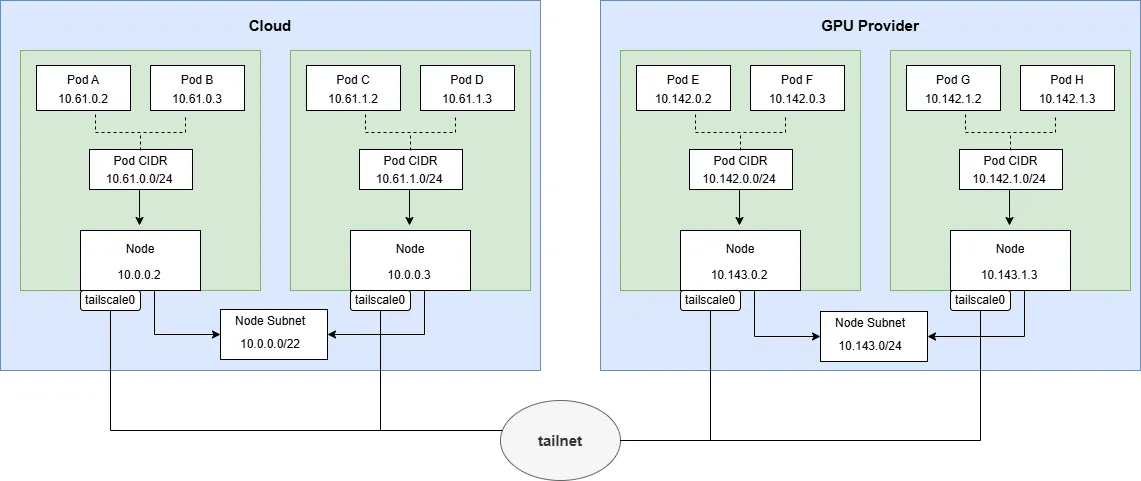
2.5 Option 2: Regional Subnet Gateway
- In each network region (like a VPC or a data center), deploy one or more Tailscale instances (for high-availability failover) to act as the region’s Subnet Router. It advertises the node subnet and pod subnet for this region.
- You need to configure routes on the nodes or gateways to access the pod and node subnets of other regions, with the next hop being the node running Tailscale. For high availability, you can configure multiple equal-cost routes.
Pros:
- High Network Performance: Only cross-region traffic goes through the Tailscale gateway. Intra-region traffic goes directly through the underlying network, with performance close to native.
- Simple Configuration, Fewer Devices: Each region only needs a few gateway instances, which greatly saves on Tailscale device quotas.
Cons:
- Large Blast Radius: If a gateway instance goes down, all cross-network communication for the entire region will be interrupted. Although you can achieve high availability by deploying multiple instances, a failover typically takes about 15 seconds.
My Choice:
Considering the complexity of configuration, network performance, and scalability, I ultimately chose Option 2. It better meets the requirements for performance and maintainability in a production environment.
2.6 Hands-on Walkthrough: A Step-by-Step Guide
Below, we will build Option 2 step-by-step. The software versions used in this article are:
- Tailscale: v1.84.3
- Kubernetes: v1.33.1
- Cilium: v1.17.4
2.6.1 1. Generate a Tailscale OAuth Client
Click “Generate OAuth client”, and in the pop-up window, under the Keys section, check the Write permission for OAuth Keys.
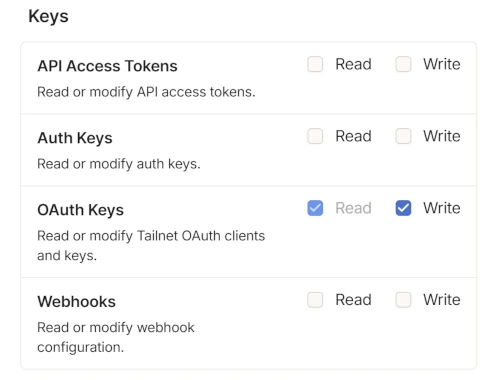
generate-oauth-client Click “Generate client”, and then immediately save the generated Client Secret. This secret will only be shown once and cannot be retrieved again!
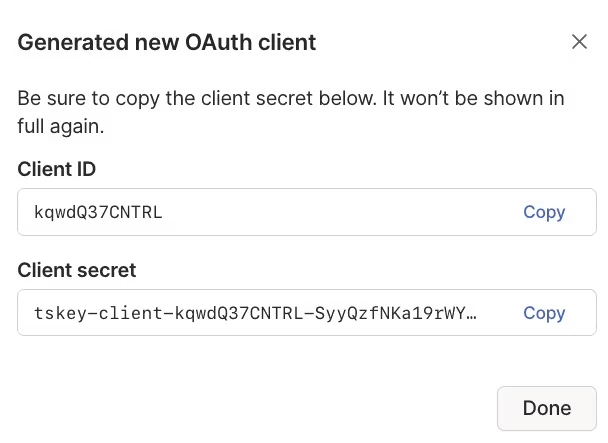
generated-oauth-client
2.6.2 2. Configure Tailscale ACLs
- Visit the Tailscale ACLs configuration page
- In the JSON configuration, add the tagOwners and autoApprovers fields. We’ll define a tag
tag:k8sand allow devices with this tag to automatically advertise the subnets we have planned.
      "tagOwners": {
		"tag:k8s":          [],
	},

     "autoApprovers": {
		"routes": {
		    # pod cidr 1
			"10.61.0.0/16":  ["tag:k8s"],
			# node cidr 1
			"10.0.0.0/22":   ["tag:k8s"],
			# pod cidr 2
			"10.142.0.0/20": ["tag:k8s"],
			# node cidr 2
			"10.143.0.0/24": ["tag:k8s"],
		},
	}
2.6.3 3. Deploy the Tailscale Gateway in the Cloud Region (DaemonSet)
In the cloud region (where the control-plane nodes are located), select a few nodes (set the label tailscale: "true") to act as gateways, and deploy Tailscale using a DaemonSet.
This will generate ephemeral nodes, with keys that never expire, and the tag will be tag:k8s.
apiVersion: v1
kind: Secret
metadata:
  name: tailscale-oauth
  namespace: tailscale
stringData:
  TS_AUTHKEY: tskey-client-abcd-edfgh # replace to your client Secret
---
apiVersion: v1
kind: ServiceAccount
metadata:
  name: tailscale
  namespace: tailscale
---
apiVersion: rbac.authorization.k8s.io/v1
kind: Role
metadata:
  name: tailscale
  namespace: tailscale
rules:
- apiGroups: [""] # "" indicates the core API group
  resources: ["secrets"]
  # Create can not be restricted to a resource name.
  verbs: ["create"]
- apiGroups: [""] # "" indicates the core API group
  resources: ["secrets"]
  verbs: ["get", "update", "patch"]
- apiGroups: [""] # "" indicates the core API group
  resources: ["events"]
  verbs: ["get", "create", "patch"]
---
apiVersion: rbac.authorization.k8s.io/v1
kind: RoleBinding
metadata:
  name: tailscale
  namespace: tailscale
subjects:
- kind: ServiceAccount
  name: "tailscale"
roleRef:
  kind: Role
  name: tailscale
  apiGroup: rbac.authorization.k8s.io
---
apiVersion: apps/v1
kind: DaemonSet
metadata:
  name: subnet-router
  namespace: tailscale
  labels:
    app: tailscale
spec:
  selector:
    matchLabels:
      app: tailscale
  template:
    metadata:
      labels:
        app: tailscale
    spec:
      tolerations:
      - key: node.kubernetes.io/not-ready
        effect: NoSchedule
      - key: node-role.kubernetes.io/master
        effect: NoSchedule
      - key: node-role.kubernetes.io/control-plane
        effect: NoSchedule
      nodeSelector:
        tailscale: "true"
      serviceAccountName: "tailscale"
      hostNetwork: true
      dnsPolicy: ClusterFirstWithHostNet
      containers:
      - name: tailscale
        imagePullPolicy: IfNotPresent
        image: "ghcr.io/tailscale/tailscale:v1.84.3"
        command:
        - /bin/sh
        - -c
        # Set environment variable TS_KUBE_SECRET to the name of the k8s secret
        # that will store the Tailscale state.
        - TS_KUBE_SECRET=tailscale-$(HOST_IP) /usr/local/bin/containerboot
        env:
        - name: TS_USERSPACE
          value: "false"
        - name: TS_DEBUG_FIREWALL_MODE
          value: auto
        - name: TS_AUTHKEY
          valueFrom:
            secretKeyRef:
              name: tailscale-oauth
              key: TS_AUTHKEY
              optional: true
        # advertise the routes for the node subnet and the pod subnet
        - name: TS_ROUTES
          value: "10.61.0.0/16,10.0.0.0/22"
        # set tags for the node and accept routes and disable SNAT for the subnet routes
        - name: TS_EXTRA_ARGS
          value: "--advertise-tags=tag:k8s --snat-subnet-routes=false --accept-routes"
        - name: PORT
          value: "41641"
        - name: POD_NAME
          valueFrom:
            fieldRef:
              fieldPath: metadata.name
        - name: POD_UID
          valueFrom:
            fieldRef:
              fieldPath: metadata.uid
        - name: HOST_IP
          valueFrom:
            fieldRef:
              fieldPath: status.hostIP
        # - name: HOST_NAME
        #   valueFrom:
        #     fieldRef:
        #       fieldPath: spec.nodeName
        securityContext:
          privileged: true
Key Configuration Points Here:
- nodeSelector: Ensures the DaemonSet only runs on nodes with the label tailscale: “true”, which are typically edge nodes with public IPs.
- hostNetwork: true: You must use host networking mode so that Tailscale devices can connect directly.
- PORT: Sets the port Tailscale listens on for connections between Tailscale devices.
- TS_KUBE_SECRET: Persists Tailscale’s state (like device keys and ID) to a Kubernetes Secret to prevent identity loss after a pod restart. Here, I’m setting it to tailscale-$(HOST_IP).
- TS_ROUTES: The subnet ranges this gateway is responsible for, separated by commas.
- TS_EXTRA_ARGS: Used to set additional command-line arguments.
- –advertise-tags=tag:k8s: Sets the node’s tag.
- –snat-subnet-routes=false: Disables SNAT for traffic accessing the tailnet through it. This is critically important. This way, the destination Pod sees the real source IP of the requesting Pod, not the gateway’s IP. This is crucial for network policies and log auditing.
- –accept-routes: Accepts route advertisements from other Tailscale nodes and automatically configures routes on the node.
2.6.4 4. Deploy Tailscale on External GPU Nodes (Static Pod)
An external GPU node needs to connect to the apiserver to join the cluster, but connecting to the apiserver requires the Tailscale network, which creates a ‘chicken and egg’ problem. To solve this, we use a Static Pod to start the first gateway.
# This is to solve the problem of external node connection to apiserver
apiVersion: v1
kind: Pod
metadata:
  name: apiserver-connector
  namespace: tailscale
  labels:
    app: apiserver-connector
spec:
  hostNetwork: true
  containers:
  - name: tailscale
    imagePullPolicy: IfNotPresent
    image: "ghcr.io/tailscale/tailscale:v1.84.3"
    env:
    - name: TS_USERSPACE
      value: "false"
    - name: TS_DEBUG_FIREWALL_MODE
      value: auto
    - name: TS_AUTHKEY
      value: tskey-client-abcd-edfgh # replace to your client Secret
     # advertise the routes for the node subnet and the pod subnet
    - name: TS_ROUTES
      value: "10.142.0.0/20, 10.143.0.0/24"
    - name: TS_EXTRA_ARGS
      value: "--advertise-tags=tag:k8s --snat-subnet-routes=false --accept-routes"
    - name: PORT
      value: "41641"
    # When running on Kubernetes, containerboot defaults to storing state in the
    # "tailscale" kube secret. To store state on local disk instead, set
    # TS_KUBE_SECRET="" and TS_STATE_DIR=/path/to/storage/dir. The state dir should
    # be persistent storage.
    # to avoid chicken and egg problem, we need to store to host path
    - name: TS_STATE_DIR
      value: /var/lib/tailscale
    - name: POD_NAME
      valueFrom:
        fieldRef:
          fieldPath: metadata.name
    - name: POD_UID
      valueFrom:
        fieldRef:
          fieldPath: metadata.uid
    securityContext:
      privileged: true
    volumeMounts:
    - name: tailscale-state
      mountPath: /var/lib/tailscale
  volumes:
  - name: tailscale-state
    hostPath: /data/tailscale-state
Key Configuration Points Here:
- Here, TS_AUTHKEY is set directly with a value instead of being fetched from a secret, so it doesn’t need to connect to the apiserver.
- TS_STATE_DIR is set to persist the state to the node’s local disk (instead of a secret), also to break the dependency on the ApiServer.
2.6.5 5. Configure MSS Clamping
WireGuard adds extra headers to packets, which can cause the packet size to exceed the MTU (Maximum Transmission Unit), leading to network problems, especially for TCP connections. We need to set up MSS Clamping on all Tailscale gateway nodes.
iptables -t mangle -A FORWARD -o tailscale0 -p tcp -m tcp --tcp-flags SYN,RST SYN -j TCPMSS --clamp-mss-to-pmtu3 Pitfalls / Traps
But don’t get too excited just yet, there are many pitfalls waiting for you. Let me share the ones I’ve encountered:
3.1 Pitfall 1: Kubernetes Multi-NIC and Cilium Network Policies
Because Tailscale creates a tailscale0 network interface on the node and configures a CGNAT IP from the 100.64.0.0/10 range, this interface is responsible for cross-region network access.
However, K8s and Cilium do not recognize the IP on this interface. The status.addresses of the Node does not include this IP, and neither does the spec.addresses in the CiliumNode.
In a CiliumNetworkPolicy, this IP does not belong to the ‘remote-node’ entity.
Symptom: When a CiliumNetworkPolicy rule is enabled to only allow ingress traffic from ’node’ and ‘remote-node’, traffic from a node running Tailscale to a cross-region node or pod will be denied by the policy because the source IP (from the tailscale0 interface) is not recognized by Cilium as a legitimate remote-node.
Related Issue: For details, please see cilium/cilium#40192
3.2 Pitfall 2: Fwmark Conflicts Between Tailscale and Calico/Cilium
Tailscale, Calico, and Cilium all use fwmark to mark packets, and unfortunately, they use the same mark values, which leads to bizarre network anomalies.
Calico Conflict: Tailscale uses fwmark 0x80000 to mark its own generated traffic and 0x40000 to mark traffic from network interfaces, while Calico also uses the same fmarks. For details, see tailscale/tailscale#591.
Cilium Conflict: Starting from Tailscale version 1.58.2, in nftables mode, it uses fwmark 0x400 to mark traffic from network interfaces. However, Cilium uses 0x400 to mark its overlay network traffic. For details, see tailscale/tailscale#11803 cilium/cilium#36104
3.3 Pitfall 3: Tailscale Default Subnet Conflict
Tailscale uses 100.64.0.0/10 by default, but some public clouds (like Alibaba Cloud) also use these addresses, which leads to network conflicts.
Although you can use the IP Pool feature to specify the network range for your tailnet, Tailscale still uses some internal reserved subnets:
100.100.0.0/24
100.100.100.0/24
100.115.92.0/23
At the same time, even if you manually specify a subnet using IP Pool, it still hardcodes the 100.64.0.0/10 subnet in nftables/iptables. For details, see tailscale/tailscale#12828
4 Conclusion
By adopting the Kubernetes + Tailscale combination, this solution not only significantly reduces the cost of AI model training and inference but also maintains the elasticity and unified management capabilities of a cloud-native architecture. However, this solution also faces some challenges, such as how to use storage resources across regions and how to schedule ingress traffic across regions.
Tailscale’s support for Kubernetes is not yet mature; it is currently only usable. The Tailscale operator is suitable for few scenarios and still has many issues, currently in a beta state.
5 Reference
https://tailscale.com/kb/1185/kubernetes
https://tailscale.com/blog/kubernetes-direct-connections
https://tailscale.com/kb/1015/100.x-addresses
https://tailscale.com/kb/1381/what-is-quad100
https://tailscale.com/kb/1304/ip-pool
https://tailscale.com/kb/1215/oauth-clients#registering-new-nodes-using-oauth-credentials
https://tailscale.com/kb/1019/subnets
https://tailscale.com/kb/1214/site-to-site#configure-the-subnet-router
https://tailscale.com/kb/1115/high-availability#subnet-router-high-availability
https://tailscale.com/blog/docker-tailscale-guide
https://tailscale.com/kb/1282/docker
https://tailscale.com/kb/1337/policy-syntax#autoapprovers
https://tailscale.com/kb/1028/key-expiry
https://tailscale.com/kb/1085/auth-keys
https://tailscale.com/kb/1080/cli
https://tailscale.com/kb/1278/tailscaled#flags-to-tailscaled
https://tailscale.com/kb/1411/device-connectivity
https://tailscale.com/blog/how-nat-traversal-works
https://tailscale.com/kb/1257/connection-types
https://tailscale.com/kb/1082/firewall-ports
https://tailscale.com/kb/1181/firewalls
https://tailscale.com/learn/managing-access-to-kubernetes-with-tailscale#subnet-router-deployments
https://tailscale.com/kb/1018/acls
https://tailscale.com/kb/1081/magicdns
https://tailscale.com/kb/1236/kubernetes-operator
https://github.com/tailscale/tailscale/blob/main/k8s-operator/api.md#container